While looking into something else, I stumbled upon the slides from Bruce Perens' presentation, AMBE Exposed This is from a TAPR/DCC talk in the fall of 2014. I'm not sure how I missed it at the time.
There is also a video of the talk which I haven't watched yet, on YouTube.
If you are interested in the problem of the patent encumbered CODECs that are used in DMR/MotoTRBO, APCO P25, D-STAR, and Yaesu System Fusion that keep developers from delivering the capabilities we'd like in our radio software/firmware, give this a read.
The presentation is 57 slides and chock full of background information.I'm going to keep this filed for when questions come up about why we can't do this or that without buying a dongle or using some limited software from anonymous authors.
This comes up over and over. Why doesn't my SDR, scanner, radio do DMR/MotoTRBO, D-Star, P25, etc. Recently this has come up again now that Uniden announced a DMR upgrade (for a fee) to their newest scanners the BCD-436HP and BCD-536HP. These radios already do P25 Phase 1 and 2, but there is a fee for the DMR upgrade to cover both the development costs and of course additional licensing fees to DVSI.
This will probably be of most interest to those that are familiar with and interested in open source.
There are also some good points about innovation usually coming from the upstarts and not the old guard.
Monday, May 23, 2016
Friday, May 20, 2016
First Screenshots with SpectrumSpy + Airspy
Below are some screenshots from my first tests with the new SpectrumSpy application for the Airspy. I have the original AirSpy, not sure if it's considered the R0 or R1. The scan speed is pretty fast. It is certainly a very capable spectrum analyzer. My quick tests show lots of possibilities. My hopes for the future:
The pictures. These really need to be seen at full screen to be appreciated. These are full screen from a 1920 x 1200 (16:10) monitor.

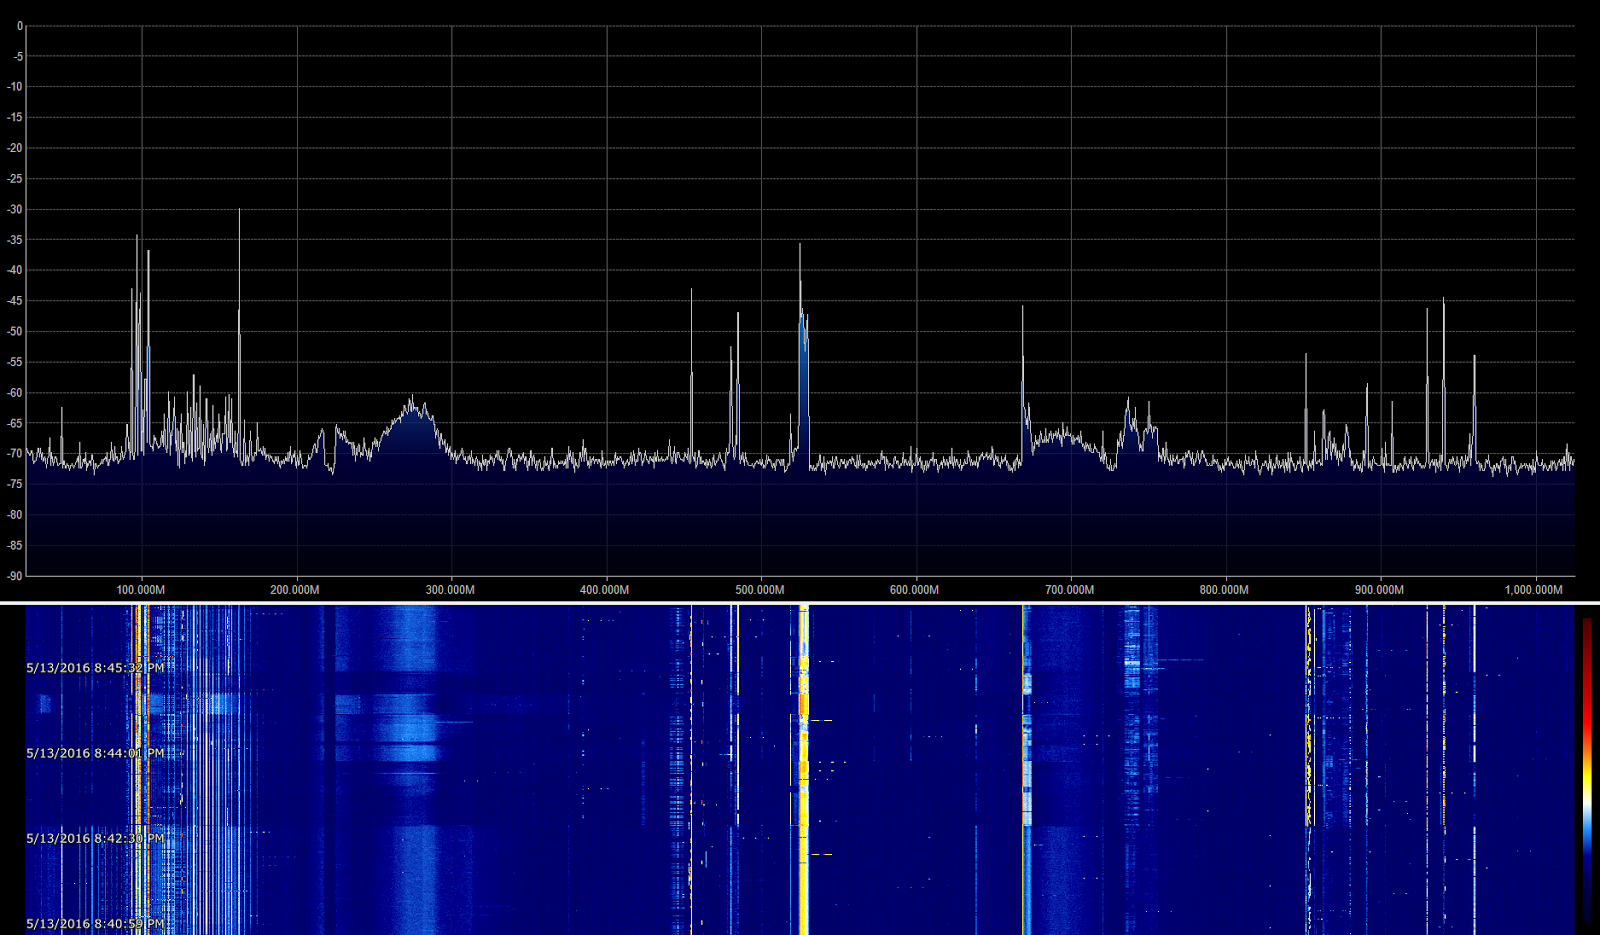
The first image is showing the full range of the R820T tuner in the Airspy from 25 Mhz up to around 1,900 Mhz. The top shows the spectrum view as you'd expect to see on an analyzer. The waterfall on the bottom is showing roughly 10 minutes of accumlated data.
Note: This is in a somewhat quiet RF environment. In other words, Not NYC! For test purposes I'm using a small hand-held whip antenna, about 6-8 inch. The gain is set pretty low.
One of the things I was looking for was how much background noise I have, and on what parts of the spectrum. Looks like there is are a couple of areas with some noise (520 mhz), 260-280 mhz, ...
Next are some screenshots that "zoom in", by reducing the scan range from the full scale using the choices from the menu, which are currently fixed. These might be editable in the XML config, but I didn't get there yet.
Next up, 1 Ghz. starting from 25 Mhz. so that means centered on 525 Mhz:

Thing to note:
Now lets look at a 500 Mhz scan:

Things to note:

Things to note:
Next, 100 Mhz scan:

Notes:

Notes:
Next, 20 Mhz, showing the FM Broadcast band:

Notes:
Lots more to play with. I have a SpyVerter up converter which will let me do < 30 Mhz, but it wasn't very interesting with only a short hand-held whip. Hopefully I'll have a chance with a random wire soon.
Please let me know what you'd like to see and any observations you have on these spectrum scans in the comments.
EDIT:
So, I'm happy that I'm able to upload these images to blogspot at full resolution. I need to figure out how to get blogspot to allow clickable thumbnail/full res. images. I'm going to try this over on Wordpress.com. I haven't done much with WordPress, but need to get some experience for a work project.
See the WordPress version of this point. Nicer looking but still no click to full-res version.
- SpectrumSpy gets integrated with SDR# (SDRsharp), allowing some ability to click into a signal from a broad scan.
- SpectrumSpy gets a plug-in architecture that will allow other developers to create new applications.
- Someone writes a Uniden Close Call equivalent, that can quickly pick out nearby signals (those that appear with a threshold (18 db?) above the adjacent noise floor. (I need to check, I think Uniden's Close Call is 18 dB.
- Ability to get data out of SpectrumSpy similar to rtl_power and rtl_power_fftw
The pictures. These really need to be seen at full screen to be appreciated. These are full screen from a 1920 x 1200 (16:10) monitor.

The first image is showing the full range of the R820T tuner in the Airspy from 25 Mhz up to around 1,900 Mhz. The top shows the spectrum view as you'd expect to see on an analyzer. The waterfall on the bottom is showing roughly 10 minutes of accumlated data.
Note: This is in a somewhat quiet RF environment. In other words, Not NYC! For test purposes I'm using a small hand-held whip antenna, about 6-8 inch. The gain is set pretty low.
One of the things I was looking for was how much background noise I have, and on what parts of the spectrum. Looks like there is are a couple of areas with some noise (520 mhz), 260-280 mhz, ...
Next are some screenshots that "zoom in", by reducing the scan range from the full scale using the choices from the menu, which are currently fixed. These might be editable in the XML config, but I didn't get there yet.
Next up, 1 Ghz. starting from 25 Mhz. so that means centered on 525 Mhz:
Thing to note:
- The waterfall shows approximately 5 minutes of data. The full bandwidth scan waterfall had nearly double that. The only factor I changed was the amount scanned. A 1 ghz scan completes in half the time of the full bandwidth approx 1.9 ghz scan.
- FM Broadcast between 88 Mhz and 2018 Mhz is easier to pick out.
- Problem areas where I'm picking up noise are more apparent.
- The noise at 520 Mhz isn't as constant as it looked.
- The wide scale changes in the waterfall are due to me holding the AirSpy. There are some shielding problems I need to look into. The AirSpy R2 has some fixes that my original AirSpy does not.
Now lets look at a 500 Mhz scan:

Things to note:
- Showing 500 Mhz, from 25 Mhz - 525 Mhz
- Note the noise that is generating evenly spaced lines in the 100 - 175 Mhz range. This is something I'll need to track down.
- One of the strong/constant signals that is visible is NOAA weather radio from Riverhead around 162 Mhz.
- I'm occasionally receiving air band transmissions around 120 Mhz.
- Around 440 - 450 Mhz, I'm either seeing a signal with an image, or I could be seeing repeater activity, on both the input and output frequencies.

Things to note:
- 200 Mhz, from 25 Mhz to 225 Mhz, (centered on 125 Mhz)
- waterfall now shows about 2 minutes, since the scan rate has more than doubled by going from 500 mhz to 200 mhz.
- The noise may start around 48 Mhz, and with harmonics/images roughly every 5-6 mhz.
Next, 100 Mhz scan:

Notes:
- Range 25 Mhz - 125 Mhz.
- Waterfall is covering 1.5 to 2 minutes, so scanning 100 mhz is happening pretty quickly.
- Main feature is the FM Broadcast band, 88 - 108 Mhz.
- Air band traffic visible around 123 Mhz.

Notes:
- 25 - 75 Mhz covered
- waterfall now covers only about 1 minute.
Next, 20 Mhz, showing the FM Broadcast band:

Notes:
- 88 - 108 Mhz. centered on 98 Mhz.
- It's easy to tell which are the strong FM stations in my area.
Lots more to play with. I have a SpyVerter up converter which will let me do < 30 Mhz, but it wasn't very interesting with only a short hand-held whip. Hopefully I'll have a chance with a random wire soon.
Please let me know what you'd like to see and any observations you have on these spectrum scans in the comments.
EDIT:
So, I'm happy that I'm able to upload these images to blogspot at full resolution. I need to figure out how to get blogspot to allow clickable thumbnail/full res. images. I'm going to try this over on Wordpress.com. I haven't done much with WordPress, but need to get some experience for a work project.
See the WordPress version of this point. Nicer looking but still no click to full-res version.
Saturday, February 13, 2016
Structure of Tytera MD-380 .test radio calibration settings file.
Continuing from my previous post, Reading and Backing up Tytera MD-380 calibration settings, here are some notes on the structure of the saved .test file. I'm trying to decode the layout using hexdump -C.


First here are the screen shot of the data for reference:
Now here is the hexdump -C output.
So MD-380.exe, writes out 8 KB, but it looks like only 512 bytes are actually used. the bytes from 512-8192 are all set to 0xFF.
First thing that is easy to spot by eye, the row labeled "Mod1 Partial is all 128 (decimal) which is 0x80 in hex. A row of '80 80 80' appears at the line with the address 0xE0 (224 bytes into the file).
There are 9 columns in the GUI and it is easy to see that most of the rows of 16 bytes have 9 values and 7 bytes of 0xFF. So that's a nice convenient 16 byte per row layout in the file.
Moving up in the screen shot, the first row with data in all columns is "Tx Hight Power" with values of 145, 146, 147, 144 which is hex 91, 92, 93, 90. This is easy to spot in the second row of the hexdump.
So there are only 16 bytes before that. The GUI shows 13 rows before that, but the 11 rows VOX1, VOX10, ..., Freq. Adjust (Low), only have values in one column. So next step is to locate these values, which are 10, 150, 137, 173, (hex 0a, 96, 89, ad). Those as easily spotted as the first bytes of the file starting at offset 0. There are 11 bytes there that aren't 0xFF.
OK so far we know:
It should be pretty easy to map this into Chirp's bitwise definition.
Hopefully this will be of use to some.
--Rob


First here are the screen shot of the data for reference:
Now here is the hexdump -C output.
00000000  0a 96 89 ad 4b 82 7b ff  62 68 6e ff ff ff ff ff  |....K.{.bhn.....|
00000010  91 92 93 90 8d 8d 8d 8f  91 ff ff ff ff ff ff ff  |................|
00000020  4d 4d 4d 4b 49 45 41 41  42 ff ff ff ff ff ff ff  |MMMKIEAAB.......|
00000030  5e 74 8b 9c ae bf d0 dd  ea ff ff ff ff ff ff ff  |^t..............|
00000040  1c 1a 19 19 19 19 19 19  1a ff ff ff ff ff ff ff  |................|
00000050  2d 2a 28 27 27 2c 31 2d  2a ff ff ff ff ff ff ff  |-*('',1-*.......|
00000060  35 32 2f 2c 2a 2b 2c 2c  2c ff ff ff ff ff ff ff  |52/,*+,,,.......|
00000070  36 34 33 2f 2c 31 36 33  31 ff ff ff ff ff ff ff  |643/,1631.......|
00000080  03 03 04 04 04 04 04 04  04 ff ff ff ff ff ff ff  |................|
00000090  25 24 23 22 22 21 20 1f  1f ff ff ff ff ff ff ff  |%$#""! .........|
000000a0  2b 2a 2a 28 27 26 26 25  24 ff ff ff ff ff ff ff  |+**('&&%$.......|
000000b0  37 36 36 35 35 34 33 31  2f ff ff ff ff ff ff ff  |76655431/.......|
000000c0  64 64 64 64 64 64 64 64  64 ff ff ff ff ff ff ff  |ddddddddd.......|
000000d0  1f 1d 1c 1c 1d 1c 1c 1c  1c ff ff ff ff ff ff ff  |................|
000000e0  80 80 80 80 80 80 80 80  80 ff ff ff ff ff ff ff  |................|
000000f0  1e 1e 1e 1e 1e 1e 1e 1e  1e ff ff ff ff ff ff ff  |................|
00000100  00 00 00 00 00 00 00 00  00 ff ff ff ff ff ff ff  |................|
*
00000130  33 2f 2c 29 27 25 23 20  1d ff ff ff ff ff ff ff  |3/,)'%# ........|
00000140  5f 5c 5a 58 56 54 52 51  50 ff ff ff ff ff ff ff  |_\ZXVTRQP.......|
00000150  00 00 00 00 00 00 00 00  00 ff ff ff ff ff ff ff  |................|
*
00000170  32 32 32 32 32 28 1e 1e  1e ff ff ff ff ff ff ff  |22222(..........|
00000180  7f 7d 7b 79 77 70 6a 6b  6d ff ff ff ff ff ff ff  |.}{ywpjkm.......|
00000190  00 00 00 00 00 00 00 00  00 00 00 00 00 00 00 00  |................|
*
000001b0  00 35 10 40 00 45 10 40  00 35 10 41 00 45 10 41  |.5.@.E.@.5.A.E.A|
000001c0  00 35 10 42 00 45 10 42  00 35 10 43 00 45 10 43  |.5.B.E.B.5.C.E.C|
000001d0  00 35 10 44 00 45 10 44  00 35 10 45 00 45 10 45  |.5.D.E.D.5.E.E.E|
000001e0  00 35 10 46 00 45 10 46  00 35 10 47 00 45 10 47  |.5.F.E.F.5.G.E.G|
000001f0  00 95 99 47 00 50 99 47  00 00 00 00 00 00 00 00  |...G.P.G........|
00000200  ff ff ff ff ff ff ff ff  ff ff ff ff ff ff ff ff  |................|
*
00002000
So MD-380.exe, writes out 8 KB, but it looks like only 512 bytes are actually used. the bytes from 512-8192 are all set to 0xFF.
First thing that is easy to spot by eye, the row labeled "Mod1 Partial is all 128 (decimal) which is 0x80 in hex. A row of '80 80 80' appears at the line with the address 0xE0 (224 bytes into the file).
There are 9 columns in the GUI and it is easy to see that most of the rows of 16 bytes have 9 values and 7 bytes of 0xFF. So that's a nice convenient 16 byte per row layout in the file.
Moving up in the screen shot, the first row with data in all columns is "Tx Hight Power" with values of 145, 146, 147, 144 which is hex 91, 92, 93, 90. This is easy to spot in the second row of the hexdump.
So there are only 16 bytes before that. The GUI shows 13 rows before that, but the 11 rows VOX1, VOX10, ..., Freq. Adjust (Low), only have values in one column. So next step is to locate these values, which are 10, 150, 137, 173, (hex 0a, 96, 89, ad). Those as easily spotted as the first bytes of the file starting at offset 0. There are 11 bytes there that aren't 0xFF.
OK so far we know:
- Rows 2-13 (VOX 1, ... Freq. Adjust Low) are stored in the first 11 bytes 0x00 - 0x0a.
- Rows 14-39(?) are stored from bytes 0x10 - 0x18F, as 16 bytes per row using only the first 9 bytes for each calibration value.
It should be pretty easy to map this into Chirp's bitwise definition.
Hopefully this will be of use to some.
--Rob
Read and Backup Tytera MD-380 calibration settings.
On the Tytera MD-380 Yahoo Group, Stan G4EGH, posted that there is a hidden 'Test Mode' in the MD-380 CPS programming software. in this case 'test mode' is used for reading and writing the radio's calibration settings that are usually done at the factory, but might be changed by someone with a DMR-capable service monitor in the field when recalibrating the radio. (This 'test mode' shouldn't be confused with any sort of debug mode.).
The important part about this find is that every radio has calibration settings that are specific to it. Think of it as a tuning/fine-tuning step that is done after manufacturing in order to make sure the radio is performing optimally. This step is necessary because the electronic components all have some tolerance (10%, 5%, 1%) for how close they come to their specified value.
Making a backup of your radio's calibration settings is a good idea. The settings are written into flash memory or EEPROM and could become corrupted or lost. If you don't know what the settings are, and don't have the proper test equipment you might have to send the radio in to be recalibrated.
The procedure to make a backup of your Tytera MD-380's calibration data using Tytera's MD-380 CPS v1.30 programming software is:
Here's are two screen shots from my radio. Unfortunately, I couldn't resize the window to make it all fit:
I've opened an issue in Travis Goodspeed's md380tools github repo to track progress of adding this capability to md380tools.
Hope this helps somebody.
The important part about this find is that every radio has calibration settings that are specific to it. Think of it as a tuning/fine-tuning step that is done after manufacturing in order to make sure the radio is performing optimally. This step is necessary because the electronic components all have some tolerance (10%, 5%, 1%) for how close they come to their specified value.
Making a backup of your radio's calibration settings is a good idea. The settings are written into flash memory or EEPROM and could become corrupted or lost. If you don't know what the settings are, and don't have the proper test equipment you might have to send the radio in to be recalibrated.
The procedure to make a backup of your Tytera MD-380's calibration data using Tytera's MD-380 CPS v1.30 programming software is:
- Close the MD-380 software if you have it open.
- Find the setting.ini file. On a default install, for Windows 7 (64 bit), the file location is C:\Program Files (x86)\MD_380\MD_380\SoftWare_EN\setting.ini
- Edit the settings.ini file with a text editor like Notepad.
- Locate the line testmode=0 in the [setup] section. Change the value to 1. Save the file.
- Start MD-380.exe. Starting it through the normal menu/shortcut is fine.
- Connect the radio with the USB cable and turn it on.
- Hit CTRL-T, to read the data from the radio.
- Click "Save Test Data" which will save a .test file with an 8 KB binary of the calibration data.
- Put the .test file some place safe where you will be able to find it again when you need it.
Here's are two screen shots from my radio. Unfortunately, I couldn't resize the window to make it all fit:
I've opened an issue in Travis Goodspeed's md380tools github repo to track progress of adding this capability to md380tools.
Hope this helps somebody.
Wednesday, January 20, 2016
Hacking the Z-Wave Protocol with a Hack-RF
More cool stuff for home automation and hacking:
I've been doing a lot with using rtl_433 and an rtl-sdr to receive temperature and humidity sensors, outdoor weather stations, and security system sensors (aka contacts).
So, I've been wondering about receiving and decoding home automation RF protocols like Z-Wave, Insteon, Zigbee which aren't terribly open. The other day I saw this article on the RTL-SDR.com blog, "Hacking the Z-Wave Protocol with a Hack-RF", about a Shmoocon talk. Exactly what I've been waiting for. I have a HackRF in that I haven't been doing much with ... yet.
I assumed it would be possible to receive Z-Wave with an RTL-SDR. There are a number of USB Z-Wave sticks that are starting to get popular. Many home automation controllers that have one of the protocols implemented are fairly expensive and somewhat closed.
So I'm excited to see this, quoting the RTL-SDR.com post
Things are getting interesting, stay tuned for more...
Links:
I've been doing a lot with using rtl_433 and an rtl-sdr to receive temperature and humidity sensors, outdoor weather stations, and security system sensors (aka contacts).
So, I've been wondering about receiving and decoding home automation RF protocols like Z-Wave, Insteon, Zigbee which aren't terribly open. The other day I saw this article on the RTL-SDR.com blog, "Hacking the Z-Wave Protocol with a Hack-RF", about a Shmoocon talk. Exactly what I've been waiting for. I have a HackRF in that I haven't been doing much with ... yet.
I assumed it would be possible to receive Z-Wave with an RTL-SDR. There are a number of USB Z-Wave sticks that are starting to get popular. Many home automation controllers that have one of the protocols implemented are fairly expensive and somewhat closed.
So I'm excited to see this, quoting the RTL-SDR.com post
Z-wave is a wireless protocol that is used often in applications like smart home and industrial automation. It essentially allows various wireless nodes to connect and talk to one another within your house, using 900 MHz wireless technology. Some common examples of Z-wave node products might be wireless controlled lights, door locks, thermostats and other security devices like motion detectors.Unfortunately it looks like their stuff requires two HackRFs, one for transmitting and one for receiving. I unfortunately, only have one HackRF. There has been some work to enable better T/R (Transmit/Receive) switching into the HackRF libraries. I've seen the commits go by but haven't looked into them much yet.
Recently at Shmoocon 2016 (a yearly hacking and security themed conference), presenters Joseph Hall and Ben Ramsey showed how they were able to use a HackRF software defined radio and some GNU Radio based software to not only sniff Z-wave packets, but to also control Z-wave devices. What’s also interesting is that they found that encryption on z-wave devices was rarely enabled, except for five out of nine door locks that they tested where it was enabled by default.
See the full story at Hackaday and have a look at their code on GitHub.
Things are getting interesting, stay tuned for more...
Links:
- RTL-SDR.com - "Hacking the Z-Wave Protocol with a Hack-RF"
- Hack-a-day Story
- GitHub Repo.
Reverse Engineering Cheap Chinese Radio Firmware TyTera MD-380 (Shmoocon 2016 via Hackaday)
Cool Stuff:
For those who are interested in the intersection of microcontrollers, hacking, and radio, an interesting deep dive into the firmware of one of the Chinese DMR/mototrbo ($140) radios, the Tytera MD380.
Unlike the cheap analog Chinese radios (Wouxun, Baofeng) which can only be programmed once, this radio supports a firmware upgrade. The bit that is interesting for people who aren't deep into digital electronics is that this hack produced a version of the firmware that turns the MD380 into the first (hardware) DMR scanner. N2NOV has been pointing out the gap, that no scanners cover DMR for a while now.
Note: this exploration/hack is at the experimental stage, so I wouldn't consider this ready/usable/applicable to anyone but those that want to experiment and are willing to risk bricking their radio or worse.
I couldn't resist, so I ordered a Tytera MD-380 this morning. More details to come. So now my To Do list includes, learning about DMR/MotoTRBO, programming NYC area DMR amateur radio repeaters, and finding/joining communities that are covering alternative firmware development for the MD-380.
Out of the box, this radio is supposed to allow field programming (aka front panel programming) of DMR talkgroups.
Travis GoodSpeed's github repo, has a package of command-line Python tools for the MD380. Looks like enough for reading and writing the radio on Linux and Mac OS. Also there is the beginnings of a CHiRP driver for the MD380. It doesn't read/write the radio but can be used for maintaining the analog channels and banks.
Also, hack-a-day, has had some good radio articles lately that aren't that deep into digital electronics for a wider audience.
You might recognize the name Travis Goodspeed from other projects like the GoodFET, an open source JTAG adapter inspired by Dangerous Prototype's Bus Pirate.
Links:
- Hack-a-day article: Reverse Engineering Cheap Chinese Radio Firmware from Shmoocon 2016
- Hack-a-day articles in category Radio-Hacks
- PoC || GTFO Newletter with the referenced article,the article is on pages 76-87.
- Amateur Radio Guide to DMR (Digital Mobile Radio) - 28 page PDF introduction by W2XAB
- The DMR-MARC worldwide network - good web site with information about amateur DMR repeaters, and talkgroup listings
- Travis GoodSpeed's github repo
- Travis Goodspeed's blogspot blog, (last update July 2013)
Friday, January 15, 2016
More Yaesu VX-8 GPS implementation details.
4Z7DTF left a comment on my post "Another Yaesu VX-8DR external GPS with an Arduino/..." to let me know about his VX-8 Arduino GPS project on github.
There have been a number of projects that use either an Arduino or bare ATtmega microcontroller to turn the GPS module's NMEA sentences back into the a format the brain dead parser built into the VX-8's firmware can handle.
He has done some additional testing, actually fuzzing, showing the VX-8's parser does no error checking what so ever.
Also, another interesting bit, in his work, he noted there is no need for the communication to be bi-directional. I don't know what, if anything the VX-8 tries to send to the GPS module, but it appears to be unnecessary.
What is interesting about that is the microcontroller then really only needs a single serial port. Most of the other projects are bi-directional using a software UART emulation for the second port. So it might be possible to implement this project with something much smaller and even lower power. It would be interesting to see if this can be done with the ATTiny85, using something like the Adafruit 3.3V trinket. That is supposed to draw around 9 milliAmps at 8 Mhz, but 3 mA of that is just for the green power LED! The ATTiny has no built in UART, so it would be all software serial.
Thursday, January 14, 2016
Raspberry Pi (RPi) and Amateur Radio Resources
Here are a few resources you might find helpful for Linux and radio on PCs or RPis.
http://www.trinityos.com/HAM/index-ham.html
Raspberry Pi for Ham Radio Yahoo Group - a fairly active Yahoo Group. Yahoo Group Description:
http://www.trinityos.com/HAM/index-ham.html
- Ham radio software on CentOS Linux
- Getting Started with Packet Radio
- Raspberry Pi APRS and Packet Radio
- APRS beginner's guide
- Amateur Radio and Linux: Opening Doors without Windows
Raspberry Pi for Ham Radio Yahoo Group - a fairly active Yahoo Group. Yahoo Group Description:
This is a place for Amateur Radio Ops to discuss the Raspberry Pi and how it can be applied to Ham Radio. This is a moderated Group. Please keep posts civil and on topic. (Any discussion of the RPi is welcome)
Info on Intel's AMT with an open source client.
Found this blog entry, "Everything you need to know about Intel AMT and the Intel NUC with Ubuntu" on Dustin Kirkland's blog.
AMT is vaguely related to IPMI, but is somewhat Intel proprietary. The key bit of info is there is a package available for Ubuntu, amtterm, that has a command, amttool that can be used for remote management of systems with AMT built-in (Intel VPro) and enabled.
Automate Cygwin package installation, search for packages from the command line, grep the list of installed packges.
Stumbled across two things for improving life when dealing with Cygwin. (Cygwin is a port of Unix-like GNU tools for Windows.)
First, the standard Cygwin-setup utility takes command line arguments that will avoid all of the prompts, so you can have a single command to update a system without having to do a lot of clicking. See this blog post from Cody Dunne.
Put this in a batch file, run it as administrator:
Note: the key data is in the setup INI files stored in cygwin-pkgs/mirror-name/x86/setup.ini.
Hope this helps,
--Rob
First, the standard Cygwin-setup utility takes command line arguments that will avoid all of the prompts, so you can have a single command to update a system without having to do a lot of clicking. See this blog post from Cody Dunne.
Put this in a batch file, run it as administrator:
Or if you are typing it by hand:cd C:\cygwin wget -N http://cygwin.com/setup-x86.exe setup-x86.exe --no-desktop --no-shortcuts --no-startmenu --quiet-mode
Second, there is a nice command link apt-get like utility, called apt-cyg. It's a neat, simple bash script. Nothing to really install. Provides command like search, and text access to the list of installed packages. apt-cyg is in Stephen Jungel's github repo.setup-x86 -nNdq
Note: the key data is in the setup INI files stored in cygwin-pkgs/mirror-name/x86/setup.ini.
Hope this helps,
--Rob
Subscribe to:
Posts (Atom)